
How to Build a Complete At-Home Skincare Device Routine (Step-by-Step)
You’ve invested in a LED mask, maybe a microcurrent device, possibly even an RF skin-tightening tool — but now they’re sitting in your bathroom drawer because you have no idea how to use them all together. Sound familiar?
Building a cohesive at-home skincare device routine isn’t just about stacking gadgets. It’s about using the right devices, in the right order, at the right frequency so they actually complement each other — instead of canceling each other out or irritating your skin.
In this step-by-step guide, we’ll walk you through exactly how to build a complete at-home skincare device routine that fits your skin goals, your schedule, and your budget. Whether you’re a total beginner with one device or a skincare tech enthusiast with a full arsenal, this guide has you covered.
Why You Need a Skincare Device Routine (Not Just Products)
Topical skincare products — serums, moisturizers, SPF — are the foundation of any skincare regimen. But they have limitations. Most active ingredients only penetrate the outermost layers of skin. That’s where devices come in.
Skincare devices use technologies like LED light therapy, microcurrent, radiofrequency (RF), and ultrasonic waves to work on deeper layers of the skin. They stimulate collagen production, boost cellular energy (ATP), improve lymphatic drainage, and enhance product absorption in ways that creams alone simply can’t.
The key insight: devices and products work best together. A well-structured routine that combines both will deliver results that far exceed what either could achieve alone.
Step 1: Identify Your Primary Skin Goals
Before you buy a single device or plan a single session, get clear on what you’re trying to achieve. Your goals determine which devices belong in your routine.
Anti-Aging (Fine Lines, Wrinkles, Sagging)
If your primary concern is aging skin, your device toolkit should focus on:
- Microcurrent devices (like NuFACE, ZIIP, or Foreo Bear) — for muscle toning and lifting
- LED red light therapy (like the CurrentBody Skin LED Mask) — for collagen stimulation
- RF devices — for skin tightening and firming
Acne and Breakouts
For acne-prone skin, prioritize:
- LED blue light therapy — kills acne-causing bacteria (P. acnes)
- Facial cleansing devices — for deeper, more effective cleansing
- High-frequency wands — for spot treatment of active breakouts
Dullness and Uneven Texture
If your skin looks tired and lacks glow:
- Facial cleansing devices — for exfoliation and better product absorption
- LED red/NIR light therapy — for cellular regeneration
- Microcurrent — improves circulation and gives an instant “lifted” look
Hyperpigmentation and Dark Spots
For pigmentation concerns:
- LED red and near-infrared light — promotes healing and cellular turnover
- Ultrasonic infusion devices — help brightening serums penetrate more effectively
Step 2: Choose Your Core Devices
You don’t need every device on the market. In fact, a solid at-home routine works beautifully with just 2-3 well-chosen devices. Here’s how to think about building your toolkit:
The Essentials (Start Here)
1. A Facial Cleansing Device
This is the foundation. Proper cleansing ensures every other device and product works more effectively. Silicone cleansing brushes (like the Foreo Luna 4) are gentle, hygienic, and effective. They remove 99% of dirt, oil, and makeup residue — far more than hands alone.
Pros:
- Easy to use daily
- Improves absorption of all subsequent products
- Gentle enough for sensitive skin (silicone models)
Cons:
- Can over-exfoliate if used too aggressively
- Traditional bristle brushes harbor bacteria
2. An LED Light Therapy Mask
LED masks are the most versatile device you can own. Red light stimulates collagen, blue light fights acne, and near-infrared penetrates deepest for healing and inflammation. A multi-wavelength mask covers multiple skin concerns in one session.
Top picks include the CurrentBody Skin LED Mask, Omnilux Contour, and Dennis Gross DRx SpectraLite. For a deep-dive comparison, check out our best red light therapy devices roundup.
Pros:
- Hands-free (just wear it and relax)
- Clinically proven wavelengths
- No downtime or irritation
- Treats multiple concerns depending on wavelength
Cons:
- Quality masks are an investment ($150–$500+)
- Requires consistency (4-5x per week for results)
- Results are gradual (4-8 weeks minimum)
The Upgrades (Add When Ready)
3. A Microcurrent Device
Microcurrent is like a workout for your facial muscles. Low-level electrical currents tone and lift muscles, boost ATP production (cellular energy), and improve product penetration. The NuFACE Trinity+, ZIIP HALO, and Foreo Bear 2 are the leading options in 2026.
Pros:
- Visible lifting effect even after first use
- Stimulates collagen and elastin long-term
- Quick sessions (5-20 minutes)
Cons:
- Requires a conductive gel to work
- Results fade if you stop using it
- Not suitable for those with pacemakers or metal implants
4. An RF (Radiofrequency) Skin Tightening Device
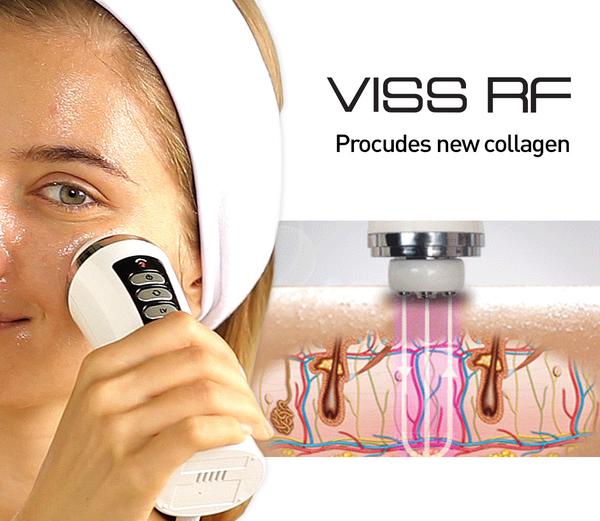
RF devices deliver thermal energy to the deeper dermis, stimulating collagen remodeling and tightening skin over time. They’re especially effective for jawline definition, nasolabial folds, and overall skin firmness. Popular options include the NEWA, TriPollar Stop Vx, and Lyma Laser.
Pros:
- Targets deeper skin layers than most other devices
- Progressive, cumulative results
- Clinical-grade technology adapted for home use
Cons:
- Sessions can take 15-30 minutes per zone
- Some devices feel warm/uncomfortable
- Not safe during pregnancy
Step 3: Learn the Correct Order of Devices
This is where most people go wrong. Using devices in the wrong order can reduce their effectiveness or even irritate your skin. Here’s the golden rule:
The correct order follows the principle: Cleanse → Treat from the inside out → Protect.
The Optimal Device Order
1. Cleansing device — Always first. Start with a clean canvas.
2. Microcurrent device — Use on clean, dry skin with conductive gel. Microcurrent works on the muscular level and should come before topical treatments.
3. RF device — If using the same day as microcurrent, RF comes after. Apply the device’s recommended conduction gel or serum. The heat from RF helps with product absorption.
4. LED mask — This is your finishing treatment. LED light therapy works regardless of what’s on your skin, so apply your serums first, then put on the mask. The light actually helps your skin absorb those serums better.
5. Skincare products — After devices, apply the rest of your routine: serums, moisturizer, and SPF (in the morning).
Important note: You do NOT need to use all devices in every session. In fact, you shouldn’t. More on scheduling below.
Step 4: Build Your Weekly Schedule
One of the biggest mistakes people make is trying to use every device every day. That’s a recipe for skin irritation and burnout. Instead, create a realistic weekly schedule that rotates your devices.
Sample Weekly Device Schedule (Anti-Aging Focus)
Monday: Cleansing device + Microcurrent (5 min) + LED mask (10 min)
Tuesday: Cleansing device + LED mask only (10 min)
Wednesday: Cleansing device + RF device (20 min)
Thursday: Cleansing device + Microcurrent (5 min) + LED mask (10 min)
Friday: Cleansing device + LED mask only (10 min)
Saturday: Cleansing device + Microcurrent (5 min) + RF device (20 min)
Sunday: Rest day — cleansing device only, focus on nourishing products
Sample Weekly Device Schedule (Acne Focus)
Monday: Cleansing device + Blue LED (10 min)
Tuesday: Cleansing device + High-frequency wand on active spots
Wednesday: Cleansing device + Blue LED (10 min)
Thursday: Cleansing device only (rest day for devices)
Friday: Cleansing device + Blue LED (10 min) + Red LED (10 min) for healing
Saturday: Cleansing device + High-frequency wand
Sunday: Rest day — cleansing device only
Frequency Guidelines by Device Type
Here’s a quick reference for how often to use each device type:
- Facial cleansing device: Daily (morning and/or evening)
- LED mask: 4-5x per week (can do daily if tolerated)
- Microcurrent: 3-5x per week during the first 60 days, then 2-3x for maintenance
- RF device: 2-3x per week (never on consecutive days)
- High-frequency wand: 2-3x per week for spot treatment
- Ultrasonic infuser: 2-3x per week
Step 5: The Complete Routine (Morning vs. Evening)
Now let’s put it all together into a practical daily routine.
Morning Routine (10-15 minutes)
1. Cleanse — Use your cleansing device with a gentle cleanser (60 seconds)
2. Tone — Apply a hydrating toner to damp skin
3. Serum — Vitamin C, hyaluronic acid, or niacinamide
4. Moisturizer — Lock everything in
5. SPF — Non-negotiable, every single day
Note: Most device work is best saved for the evening. Morning is about protection.
Evening Routine (20-40 minutes on device days)
1. Double cleanse — Oil cleanser first (to remove sunscreen/makeup), then cleansing device with water-based cleanser
2. Microcurrent (if scheduled) — Apply conductive gel, glide device upward and outward for 5-20 minutes. Remove gel residue.
3. RF device (if scheduled) — Apply conduction medium, treat each zone slowly and methodically.
4. Apply serums — Retinol, peptides, or your treatment serum of choice.
5. LED mask (if scheduled) — Put it on over your serums and relax for 10 minutes. The LED light enhances product penetration.
6. Moisturizer/Night cream — Seal everything in.
7. Eye cream — Gentle patting around the orbital bone.
Step 6: Common Mistakes to Avoid
Even with the right devices and the right schedule, mistakes can sabotage your results. Here are the most common pitfalls:
1. Using Too Many Devices in One Session
More is not always more. Using microcurrent + RF + LED + an ultrasonic device all in one evening is overkill. Your skin needs time to respond and recover. Stick to 2-3 devices maximum per session.
2. Skipping the Conductive Medium
Microcurrent and RF devices require a conductive gel or serum to work properly. Using them on dry skin not only reduces effectiveness — it can cause discomfort and uneven energy delivery. Always use the recommended medium.
3. Inconsistency
The number one reason people don’t see results with skincare devices is inconsistency. These aren’t magic wands — they require regular, sustained use. Commit to at least 8 weeks before judging results. Set phone reminders if you need to.
4. Using Active Ingredients at the Wrong Time
Don’t use strong chemical exfoliants (AHAs, BHAs) immediately before microcurrent or RF devices — the combination can irritate sensitized skin. If you use chemical exfoliants, do them on your device rest days.
5. Neglecting Device Hygiene
Clean your devices after every use. Gel residue, bacteria, and product buildup can cause breakouts and reduce device effectiveness. A quick wipe with a damp cloth or alcohol pad takes 30 seconds.
Step 7: Track Your Progress
Skincare devices deliver gradual results, which means it’s easy to forget how far you’ve come. Here’s how to track effectively:
- Take photos — Same lighting, same angle, same time of day. Weekly photos in natural light are ideal.
- Keep a device journal — Note which devices you used, for how long, and any skin reactions.
- Set milestone check-ins — Review progress at 4 weeks, 8 weeks, and 12 weeks. Most devices show visible improvement by the 8-week mark.
- Note how your skin feels — Sometimes texture, firmness, and radiance improve before visible wrinkle reduction.
Budget-Friendly Ways to Start
Not ready to invest $1,000+ in a full device lineup? Here’s how to start small and build over time:
Phase 1 — Under $100: Start with a quality facial cleansing device. The Foreo Luna Play Plus 2 (~$50) or a silicone cleansing brush is an excellent entry point.
Phase 2 — Under $300: Add an LED mask. Check out our best LED face masks roundup for options at every price point.
Phase 3 — Under $600: Add a microcurrent device. The NuFACE Mini ($209) is a great entry-level option, while the ZIIP HALO ($495) offers more versatility.
Phase 4 — The Full Setup: Add an RF device for the ultimate anti-aging routine. Budget $300-$600 for a quality home RF device.
Pro tip: Watch for Black Friday, Prime Day, and holiday sales. Also check K-beauty alternatives on Amazon — many offer comparable technology at lower price points.
Who Should NOT Use Skincare Devices
While at-home skincare devices are generally safe, they’re not for everyone. Consult your dermatologist before starting a device routine if you:
- Have a pacemaker or other implanted electrical device
- Are pregnant or nursing
- Have active skin infections, open wounds, or severe inflammatory acne
- Have epilepsy or are photosensitive
- Have metal implants in the treatment area
- Are currently using Accutane or have used it in the past 6 months
When in doubt, always check with a dermatologist first.
Final Thoughts: Consistency Beats Complexity
If there’s one takeaway from this guide, it’s this: a simple, consistent routine will always outperform a complicated one you don’t stick to.
Start with one or two devices. Master the routine. See results. Then add more as your budget and motivation allow. The most expensive device in the world is worthless if it sits in a drawer collecting dust.
Your skin is unique, and your routine should be too. Use this guide as a framework, but listen to your skin. If something causes irritation, dial it back. If something feels amazing, lean into it. The beauty of at-home devices is that you’re in control.
Ready to build your routine? Start by choosing your first (or next) device from our curated guides:
- Best LED Face Masks for Anti-Aging in 2026
- Best Microcurrent Facial Devices 2026
- 7 Best Red Light Therapy Devices for Home Use
- Red Light Therapy vs Blue Light Therapy: Which One Do You Need?
Have questions about building your device routine? Drop them in the comments below — we read and respond to every one!


2 Comments